Thursday, November 29, 2012

Pumpkin Pie (From Scratch)


So I am a little more ambitious than most... I hate throwing away the pumpkins from my Fall decorations so I cook them and make home made puree. For this recipe you can use canned pumpkin puree (not pumpkin pie mix) or you can try your hand at cooking your pumpkins... though do keep in mind if you live with anyone warn them and ask for patience!
I will admit, the name brand pumpkin pie in a can where you just add eggs, evaporated milk and pour into a pie shell is delicious and has been my "go to" for many years. But being the person I am I love to say that "I made it myself". Thank you family for being so patient with me while I take up the fridge with my draining pumpkin and pumpkin splatter literally everywhere. So if you feel ambitious, I tried to break down the process as much as possible for you... recipe here.
This recipe is a little less sweet than the pie in the can version but I think it is the perfect and to a holiday meal.


Pumpkin Pie


2 Cups Pumpkin Puree
1 12oz can Evaporated Milk
1/3 Cup White Sugar
1/2 Cup Brown Sugar
1/2 Tsp Salt
2 Eggs plus 1 Egg Yolk
2 Tsp Ground Cinnamon
1 Tsp Ground Ginger
1/4 Tsp Ground Clove
1/2 Tsp Ground Nutmeg
1 Crust (See below for Graham Cracker Crust)

1. Pre heat oven to 425 F
2. Mix sugars, spices and salt. 
3. Beat eggs and add to mixture
4. Mix in pumpkin puree and then mix in the evaporated milk
5. Pour into pie shell
6. Bake at 425 F for 15 minutes
7. Reduce oven heat to 350 F and bake for 45 more minutes (check by gently wiggling pie...it should not jiggle. You can also stick a knife into the center and if it comes out clean the pie is done)
8. Let pie cool completely to finish setting before cutting. Enjoy!

Graham Cracker Crust

1 1/2 Cups Graham Cracker Crumbs
6 tbs melted butter
1/3 cup white sugar
1/2 tsp cinnamon

Mix all ingredients together and press firmly into pie dish.
For this pie there is no need to pre bake.

Pumpkin Puree

You can use any sort of pumpkin, though small "pie pumpkins" tend to be sweeter. When I use the larger pumpkins I just add more sugar to my recipe that I will use the pumpkin for later. This recipe is to make raw pumpkin puree (much like the kind you get in a can) and can be applied to many recipes such as pumpkin pie, pumpkin bread or even pumpkin cookies. Don't get frustrated! Let me know if you have any questions!

Tools:
Sharp Knife (serrated is best)
Cookie Sheet
Foil
Blender
Cheese Cloth
Strainer


1. Pre-heat oven to 357 F and line a cookie sheet with foil.


2. Cut pumpkin in half horizontally (around widest part of the pumpkin) and scoop all of the seeds and stringy pulp out.


3. Place the pumpkin halves skin side out on the cookie sheet. Cover loosely with a sheet of foil and put into the oven. Cook the pumpkins for approximately 45 minutes to an hour (sometimes longer depending on the thickness of the pumpkin). The pumpkin is done when you can stick the dull side of a butter knife right through the rind.


4. Remove the pumpkin and let cook completely before handling.


5. Once cooled scoop the pumpkin pulp from the skin into a bowl


6. Put the pumpkin pulp into the blender and blend completely. This step is very important especially if you plan to use the puree for pie or pumpkin butter. You want the puree to be completely smooth. When you run your finger through the puree it should feel almost soft.


7. Prepare the cheesecloth by cutting it into large squares (approx 12in x 12in). Layer the cheesecloth squares over the strainer... you will need at least 6 - 8 squares. This step takes some practice and you will develop your own techniques as you do this more and more.


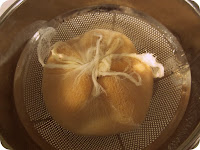
8.  Place the strainer over a bowl or the sink. Pour the puree into the cheesecloth. Tie the first layer of cheesecloth by tying opposite corners together. Repeat with the next two layers of cheesecloth...tying it tighter each time.


9. Turn the ball over and continue to tie the layers of cheesecloth until you have a tight ball.


10. Leave the ball in the strainer over a bowl and place in the fridge for at least 4 hours. I prefer to leave it overnight. You can even add weight on top after an hour or so to make sure the pumpkin gets completely drained.

11. Cut open the cheesecloth and you should have pumpkin puree ready to become a pie or butter! :) Enjoy!


Yield: One Pie Pumpkin makes approximately 2 cups of puree.

Friday, November 16, 2012

Apple Cider

Nothing says "Fall" like apple cider (except maybe pumpkin pie!). My fiance and I went to a local apple orchard to get in the spirit of the season and came home with some great wine sap apples. As much as I wanted to I just couldn't eat all of the apples so I decided to try to make apple cider for the first time. It sounds so intimidating at first but it is incredibly simple! Granted, I did not go for any of the fermentation, so this is not a true "cider", however this was so simple I don't think I would make it any other way. I made a large pot just before Halloween and shared with my family while we passed out candy to the trick or treaters. I think I found a new fall tradition!


Homemade Apple Cider

8- 10 Apples (the choice is yours depending on your preference of sweetness)
1/2 - 1 cup Sugar (to taste)
4 tbs Cinnamon
4 tbs Allspice

1. Cut apples in to quarters (no need to peel)


2. Place apple in large pot and cover with water

3. Add Sugar

4. Wrap spices in either a double layer of cheesecloth or coffee filter. Tie shut with string or twist tie. Place into the pot with the apples.


5. Boil on high for 1 hour (uncovered). Be sure to stir periodically and make sure spices are not leaking. If they do, add another layer of cheesecloth or coffee filter.

6. Turn down heat (low/ med) and simmer for another 2 hours.

7. Turn off heat and let mixture cool

8. Remove spices and mash the apples to a pulp consistency (you can use a potato masher)


9. Strain mixture into a bowl. You can use more cheesecloth if you don't have a small weave strainer

10. Reheat in the microwave or on the stove. You can just sip the cider plain or top with whipped cream, a little cinnamon and/ or caramel sauce. Enjoy!
We enjoyed ours with a slice of pumpkin cheesecake


Monday, September 17, 2012

Chocolate Peanut Butter Cupcakes

Yes... I absolutely cannot help myself...this is another chocolate peanut butter recipe. This time I had a great excuse...it was one of my Bridesmaid's birthday and this is also her favorite combination (yay, another excuse to use chocolate and peanut butter to the extreme!). I found a cake recipe I liked and modified it to cupcake form with a few twists here and there. I did use a box cake mix rather than go completely scratch this time...sometimes you just have to save the time. When I want to play with the toppings and fillings I usually use a box cake mix so I can put more energy into the garnish. These are so yummy I think everyone at the party had two!! Like I always say...absolutely cannot go wrong with this perfect combination.

Happy Baking!!


Chocolate Peanut Butter Cupcakes

1 box chocolate cake mix

Peanut Butter Cream Cheese Frosting
10oz cream cheese (room temperature)
1 stick unsalted butter (room temperature)
4 to 5 cups of powdered sugar (sifted)
1 cup creamy peanut butter

Chocolate Peanut Butter Ganache
8oz chopped semi sweet chocolate chips
3tbs creamy peanut butter
2tbs light corn syrup
1/2 cup heavy whipping cream

Peanut butter cups for garnish

1. Bake cupcakes according to instructions on box. Let completely cool

2. Using an electric mixer, beat the cream cheese and butter until light and fluffy


3. Gradually add powdered sugar 1 cup at a time. If you do not have a sifter (I need one too) you can use a strainer and shake it over the bowl.

4. Mix in the creamy peanut butter and whip until desired consistency. Place bowl in fridge while making the ganache. 


5. Chop chocolate chips into smaller pieces. This will help it to melt more evenly.

6. Place chocolate, corn syrup and peanut butter in a double boiler. If you do not have a double boiler (again neither do I) you can place a smaller sauce pan or bowl into a larger sauce pan filled with water. Make sure your heat is on LOW. Stir the mixture constantly until melted.

6. Take the chocolate mixture off the stove and add the whipping cream. Mix until smooth.

7. Using a spoon, spread the chocolate over the top of each cupcake.

7. Pipe or spread the peanut butter icing over the top. Finish by cutting up the peanut butter cups and crumble over the top of each cupcake.


Enjoy!


Saturday, July 21, 2012

Amaretto White Chocolate Raspberry Cupcakes

YUM! That is the first thing that comes to mind when I think of these cupcakes. I also like to call them the "I can't decide what kind of icing to use so I will use them all" Cupcakes. It was "Italian Week" at concert in the park last week and I didn't want to do yet another Tiramisu. I found a recipe for cupcakes that was influenced by an Italian Zuccotto Cake. Zuccotto is Italian for "little pumpkin". The Florentine Cakes are given their name because of their dome shape. The cupcake recipe called for Brandy, not something I usually keep on hand so I decided to use Amaretto instead. One change led to another and I ended up with these decedent treats. Kevin said I was "gilding the lily" with these, but I have to disagree they are perfect...but warning they are SWEET. They may not be the Italian dessert I was going for but sometimes when you go off plan you can end up with something better!


Amaretto White Chocolate Raspberry Cupcakes


Cupcakes:
1 Box of White Cake Mix (one with pudding in the mix is best)
1/3 Cup Vegetable Oil
3 Egg Whites
1 1/4 Cup Water
6oz chocolate chips chopped fine

Filling:
1 1/2 cup cold heavy whipping cream
Approx 3 tbs powdered sugar (to taste)
Fresh Raspberries (one per cupcake)
1 to 2 tbs Amaretto (to taste)

Ganache:
1/2 cup Heavy Whipping Cream
6oz Chocolate Chips

Icing:
6oz White Chocolate Chips
1 8oz package of Cream Cheese (room temp)
1/2 cup (1 stick) Unsalted Butter (room temp)
2 tsp Vanilla Extract

Cupcakes:

1. Pre heat oven to 350 degrees F. Line muffin or cupcake tin with cupcake papers

2. Chop chocolate that will go into cake batter


2. Combine cake mix, egg whites, oil and water in medium bowl. Mix well (until most of the lumps are gone but not completely).  Add and mix in the chopped chocolate.

3. Pour the batter into the prepared tin (about 2/3 full). I suggest using a measuring spoon and be sure to put the same amount into each tin. This is important so that the cupcakes bake evenly.

4. Bake for 15 to 20 minutes. Turn on the light in your oven...try to not peek at the cupcakes by opening the door...this can cause uneven baking. The cupcakes will spring back when pressed lightly on top when finished (you can also use a toothpick to check if they are done by poking down the center of the cupcake and if it comes out clean they are done).
Let cupcakes cool for 5 minutes in tin before placing on rack to completely cool.

Filling:

1. Beat the heavy whipping cream with an electric mixer (yes, I do most of my mixing by hand but this one requires a hand mixer...it just won't work otherwise). Beat until the cream gets peaks...until you have "whipped cream". Mix in the powdered sugar, taste and adjust for desired sweetness. Add in the amaretto.

2. Using a paring knife, cut the centers of the cupcakes out. You will and up with a cone shape piece. Save tops (cut off the filling and keep the top as a "cap".)

3. Spoon a small amount of the whipped filling into the center. Place a raspberry in the center. Top with a little more filling and then cover with the saved top. Refrigerate cupcakes while you make the ganache.


Ganache:

1. Place the chocolate chips in a heat safe bowl.

2. Place heavy cream in a sauce pan and heat to a boil.

3. Pour the hot cream over the chocolate chips and let sit for 5 minutes.

4. Whisk until smooth. Let cool until a spreadable consistency (so it won't melt off the top of the cupcakes). Approx 1 hour.

5. Spoon/ spread the cooled ganache on top of the cupcakes and place back in fridge.

Frosting:

1. Place white chocolate chips in a microwave safe bowl. Microwave for 30 seconds then stir. Microwave for another 30 to 45 seconds and stir until smooth. You must do this in 30 second increments or the chocolate will cease up. Set aside

2. Use electric mixer to blend the cream cheese and butter until smooth.

3. Mix in the white chocolate and vanilla extract. Blend until desired consistency.

4. Pipe the icing on or use a spoon to spread the icing on top of the cupcakes.


Garnish:

I placed a raspberry on top of each and then used a cheese grater to grate the chocolate shavings on top of each cupcake.


Yield: approx 18 cupcakes

Saturday, June 23, 2012

Crunchy AND Gooey Peanut Butter Cookies


Okay, so I think we have established that I have a peanut butter addiction (thanks Dad! I think all those "large spoonfuls of peanut butter as a snack" growing up did me in!). I came across this recipe many years ago and decided to try it again. The best part is it only takes 3 ingredients and I can almost guarantee you have them in your pantry right now! Also a bonus is this recipe works for my gluten sensitive friends too!  (this one is for you Rach!)


Peanut Butter Cookies (The "go to" recipe)


1 Cup Crunchy or Smooth Peanut Butter
1 Cup White Sugar
1 Egg


1. Pre-Heat Oven to 350 F


2. Mix all three ingredients in a medium bowl until completely combined. The mixture will be a thick dough


3. Use your hands to roll 1 1/2 inch balls of dough and place on cookie sheet.


4. Use a fork to press the dough down in the center. Create a criss cross pattern. Press lightly until the cookie is to the desired thickness (about 1/2 an inch). These cookies do not change shape much while baking.


5. Bake cookies for 10 minutes. (Hint: you will start to smell them as they finish).


Yield: Approx 18 cookies


You should have a cookie that is soft in the middle and slightly crumbly on the edges... the way I think a peanut butter cookie should be!


Some Variations for those who like chocolate with their peanut butter...


Add 1/2 cup mini chocolate chips to the dough before baking


Place an unwrapped chocolate kiss in the center of each cookie as soon as they are removed from the oven


Melt chocolate chips over VERY LOW heat then use a spoon to drizzle chocolate over the top of each cookie

Wednesday, June 6, 2012

Apple Cookies with Caramel Drizzle

I was at the market with my friend Krysia and she raved about some apple cookies she had at a restaurant recently. It got me to think... I'm not sure I've ever tried an apple cookie. So I picked up some dry apple rings and decided to play in the kitchen to see what I could come up with. First flavor that comes to mind when I think of apples and dessert is cinnamon (and I LOVE cinnamon). So naturally the next thought was snickerdoodles. I searched through a few snickerdoodle recipes and eventually came up with this recipe for my Apple Cookies. They are nice and soft in the center and the caramel sauce gives them that "little extra something". 


I am a big fan of fall flavors so these were nice a treat in June. I am definitely going to have to bring this one back in September!

Happy Baking!


Apple Cookies with Caramel Drizzle


1 cup Chopped Dried Apples
1 tbs and 1 tsp Brown Sugar
1/4 cup Apple Juice (or Water)
1/2 cup Butter Softened (1 stick)
3/4 cup White Sugar
1 Egg
1 tsp Vanilla Extract
1 - 1/3 cup All Purpose Flour
1 tsp Baking Soda
1/8 tsp Salt

Preheat oven to 375


1. Place the chopped dried apples, brown sugar and apple juice in a small saute pan and cook over medium heat. Stir regularly and cook until the apples have absorbed the liquid (about 5 minutes). Set aside


2. In a large bowl cream the butter and sugar together until smooth. Add the vanilla and butter and blend completely.

3. In a separate bowl mix together the flour, baking soda and salt.

4. Slowly add dry ingredients to the butter mixture and mix completely.

5. Mix in the cooked apples


6. Roll the dough into 1 to 2 inch balls and place on cookie sheet.


7. Bake for 9-12 minutes (always start with the lesser amount, you can always add more time). Bake until cookies have slightly puffed up in the middle, edges are starting to firm and are slightly golden.


8. Leave cookies on baking sheet for a few minutes before placing on cooling rack. (They will collapse slightly).


Caramel Drizzle


1 cup White Sugar
6 tbs Butter
1/2 cup Heavy Whipping Cream

1. Heat sugar over med-high heat. Stir with a wooden spoon until the sugar starts to melt. As soon as the sugar starts to boil stop stirring.

2. Cook until the butter has begun to turn to an amber color.

3. Add the butter and whisk. Once the butter has melted remove from heat. Count to three then add the cream. Be very careful the mixture will foam up at this point. Continue to whisk until smooth.

4. Let sauce sit to cool a bit before drizzling on the cookies.


Wednesday, May 30, 2012

Chocolate Peanut Butter Bites (No Bake!)

Sometimes it is just too hot to turn on the oven, so even a baker needs a few "no bake" recipes in her pocket. I made these with my father in mind. My whole life my dad and I have shared a mutual LOVE for peanut butter, add chocolate and there is NO resisting! And Oh My Goodness these are yummy! If you have a soft spot for peanut butter cups, you HAVE to make these...no excuses, they don't even require an oven.


Chocolate Peanut Butter Bites (No oven required)

2 1/4 Cups Creamy Peanut Butter (divided into 1 cup and 1 1/4 cup each)
3/4 Cup Butter (salted or unsalted) (1 1/2 sticks), Softened
2 Cups Powdered Sugar (divided into 1 cup each)
3 Cups Graham Cracker Crumbs (finely ground)
2 Cups Chocolate Chips (divided into 1 cup each)


1. Grease 13 x 9 baking pan with either butter, shortening or cooking spray


2. Beat 1 1/4 cups peanut butter and butter until creamy.


3. Slowly mix in 1 cup of powdered sugar. The mixture will begin to thicken. Once fully mixed, add remaining cup of powdered sugar, graham cracker crumbs and 1/2 cup of chocolate chips. The mixture will resemble cookie dough.


4. Press mixture into bottom of greased pan. Press down hard with spatula or hands until evenly pressed tightly into the pan.


5. Melt the remaining 1 1/2 cups of chocolate and 1 cup of peanut butter over LOW heat. (Seriously, use the LOWEST heat setting possible. Chocolate burns easily. If you are comfortable with a double boiler I would recommend melting the mixture this way.) Stir constantly.


6.  Pour and spread the chocolate over the peanut butter mixture. 

7. Place the pan in the refrigerator for at least an hour... 3 hours is best. Once firm, cut the bars into 1 inch cubes. 


8. Eat at least 4 pieces...okay this part is optional but I highly recommend it